Project planning guide
Before you build
Use the reference image and planning notes as a starting point. Confirm dimensions, loads, materials, local codes, and site conditions before purchasing or cutting.
- Garden Projects
- 1 reference image
- Print-friendly guide
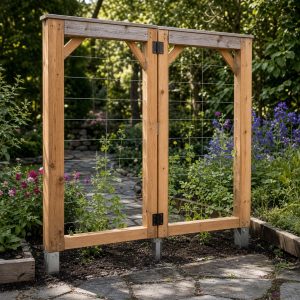
Quick answer: Build a pedestrian garden gate as a rigid rectangular frame with a diagonal compression brace running from the lower hinge corner toward the upper latch corner. Hang it from a plumb, well-supported post using exterior-rated hinges, and leave controlled clearance for seasonal wood movement without creating a wildlife gap.
Measure the finished opening
Confirm both gateposts are plumb, stable, and parallel before measuring. Record the width at the top, middle, and bottom. Base the gate on the smallest opening and the clearance required by the hinge system. A common garden gate is 36 to 42 inches wide; wider leaves create more leverage and may need heavier framing or engineered hardware.
Plan the frame and brace
Use dry, straight exterior-suitable lumber. Construct two vertical stiles and two horizontal rails on a flat surface. Compare diagonals before fastening. Fit the diagonal brace tightly between the lower hinge-side corner and upper latch-side corner so its ends bear against the frame rather than depending only on screws.
| Gate problem | Planning response |
|---|---|
| Sagging latch side | Compression brace and sound hinge post |
| Seasonal rubbing | Consistent gaps and sealed end grain |
| Rabbit opening | Fine lower mesh and controlled threshold gap |
| Gate left open | Reliable latch or appropriate self-closing hardware |
Build the gate square
- Cut the frame parts and dry-fit them on a flat surface.
- Clamp the rectangle and equalize diagonal measurements.
- Install corner joinery suitable for exterior gate loads.
- Fit the compression brace with full contact at both ends.
- Add pickets or mesh without pulling the frame out of square.
- Seal cuts and predrill near board ends.
Hang it from the right post
The hinge post carries the gate’s weight and leverage. It should be more substantial than a light line post and installed for local soil and frost conditions. Use hinge fasteners compatible with the post and hardware. Support the gate at its intended elevation during installation rather than letting hinges set the height by trial and error.
Set latch and ground clearances
Provide enough bottom clearance for gravel, mulch, frost heave, and drainage while preserving the fence’s animal-exclusion purpose. The latch should work from the required side and remain operable with gloves. Avoid a low protruding stop that becomes a trip hazard.
Connect the gate to the existing rabbit and deer fence plan. If it sits under a decorative entrance, coordinate its swing and latch with the garden arbor.
Test the gate through weather and ground changes
Allow for the post to move slightly as soil moisture and frost conditions change. The bottom gap must clear the highest point along the entire swing, not only the closed position. A removable stop or adjustable hinge can help with future correction, but neither compensates for an undersized or poorly founded hinge post.
- Place the latch where users can operate it without reaching through sharp hardware.
- Use a positive stop so wind cannot overtravel the hinges.
- Keep diagonal bracing in compression from the lower hinge toward the upper latch.
- Seal cut ends and inspect fasteners for corrosion.
After hanging, leave the gate closed and open for periods, then recheck gaps and sag. Adjust early before the frame distorts permanently or drags across the path.
Common questions
Which direction should a wooden gate brace run?
For a compression brace, run it from the lower hinge corner toward the upper latch corner. Cable anti-sag systems work in tension and follow their own instructions.
Should a gate swing into or out of a garden?
Choose the direction that preserves the path, slope, latch access, and emergency movement. Confirm local pool, animal, or egress rules where applicable.