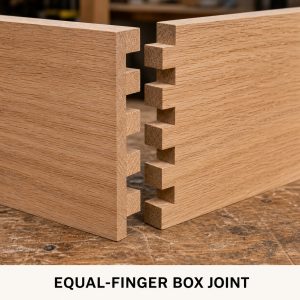
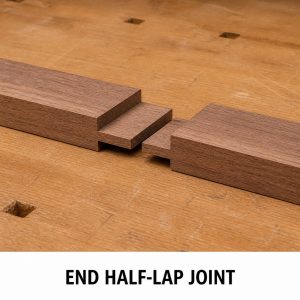
Project planning guide
Before you build
Use the reference image and planning notes as a starting point. Confirm dimensions, loads, materials, local codes, and site conditions before purchasing or cutting.
- Type of Wood Joints
- 10 reference images
- Print-friendly guide
Wood joinery becomes much easier to understand when both mating surfaces are visible. This guide uses one close-up photograph per joint, with the pieces separated just enough to show how the profiles align. The examples cover ten useful joints found in boxes, cabinets, shelves, frames, panels, and furniture.
Quick answer: Start with joints whose geometry is easy to mark and test on scrap. Accuracy matters more than complexity: matching holes, square shoulders, flat reference faces, and a dry fit usually determine whether the finished connection closes cleanly.
10 wood joints in this guide
- Dowel Joint
- Box Joint
- Rabbet Joint
- Dado Joint
- Half-Lap Joint
- Tongue-and-Groove Joint
- Biscuit Joint
- Loose Tenon Joint
- Bridle Joint
- Mortise-and-Tenon Joint
1. Dowel Joint
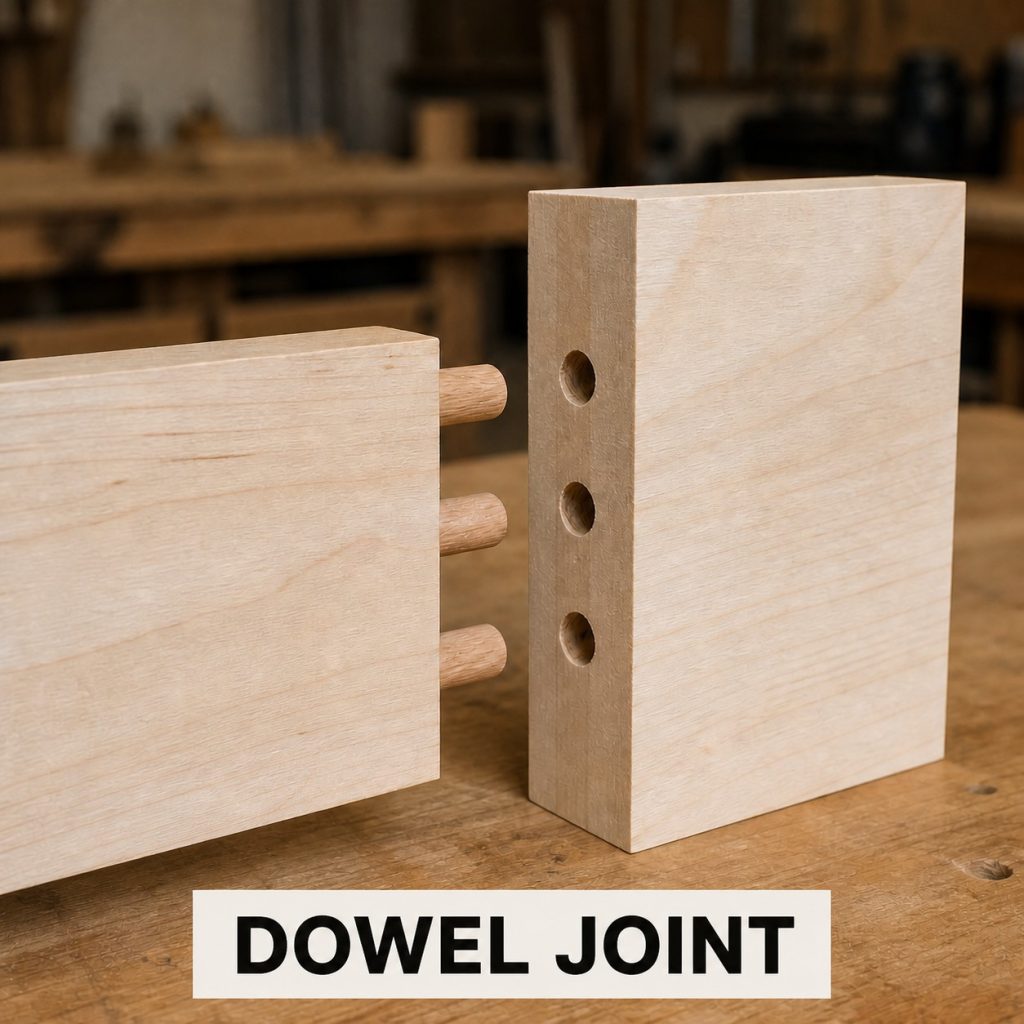
How it fits: Matching holes in both pieces accept cylindrical hardwood dowels. The dowels bridge the joint while their aligned holes register the faces and edges.
Typical uses: Dowel joints are common in cabinet parts, face frames, chairs, shelves, and flat-pack furniture where a clean exterior is desirable.
Workshop check: Use the same reference face for every layout mark and test the drilling setup on scrap. Even a small offset can prevent the shoulders from closing.
2. Box Joint
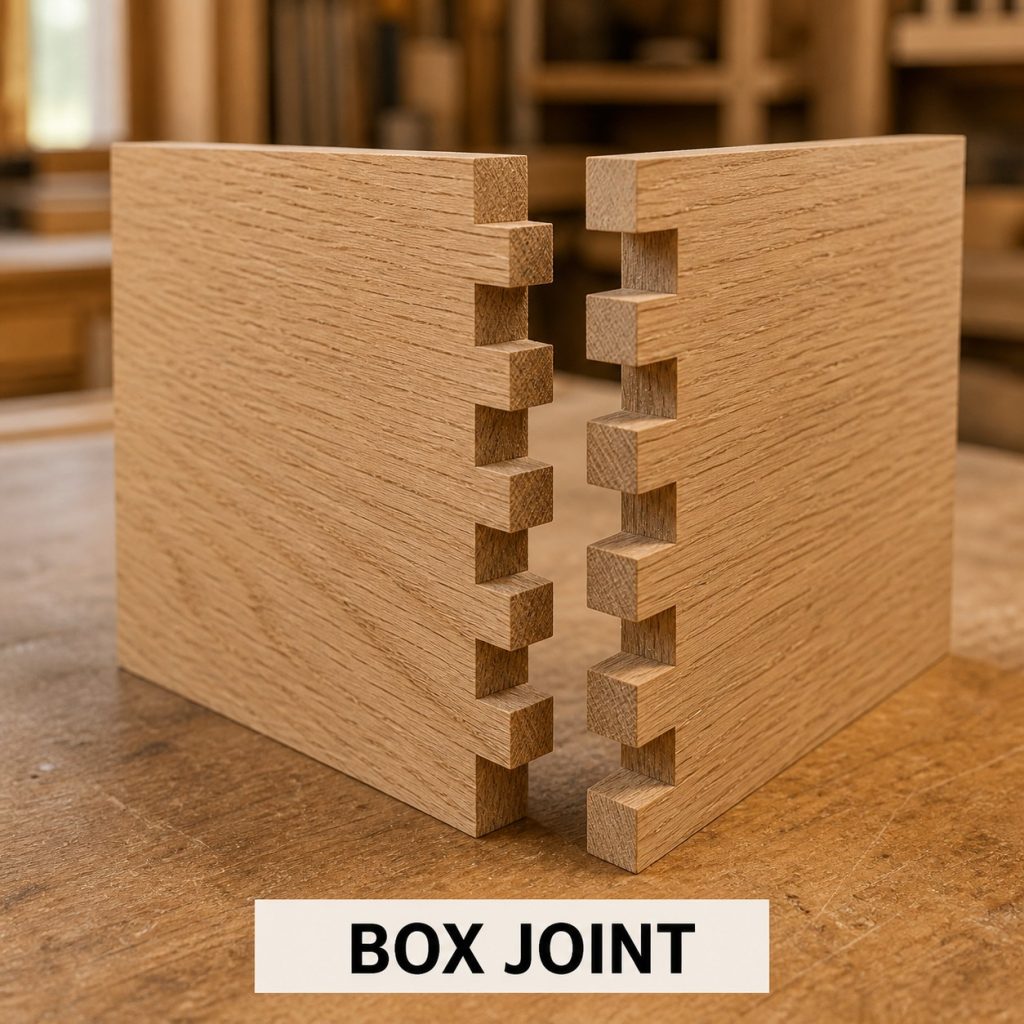
How it fits: Alternating square fingers on one board fill the matching spaces on the other. The repeated pattern creates a large long-grain glue area at a corner.
Typical uses: This joint works well for boxes, drawers, trays, small cabinets, and decorative storage projects.
Workshop check: Finger width must match the cutter spacing. Make a short test pair before cutting finished parts, then adjust for a fit that slides together without splitting the fingers.
3. Rabbet Joint
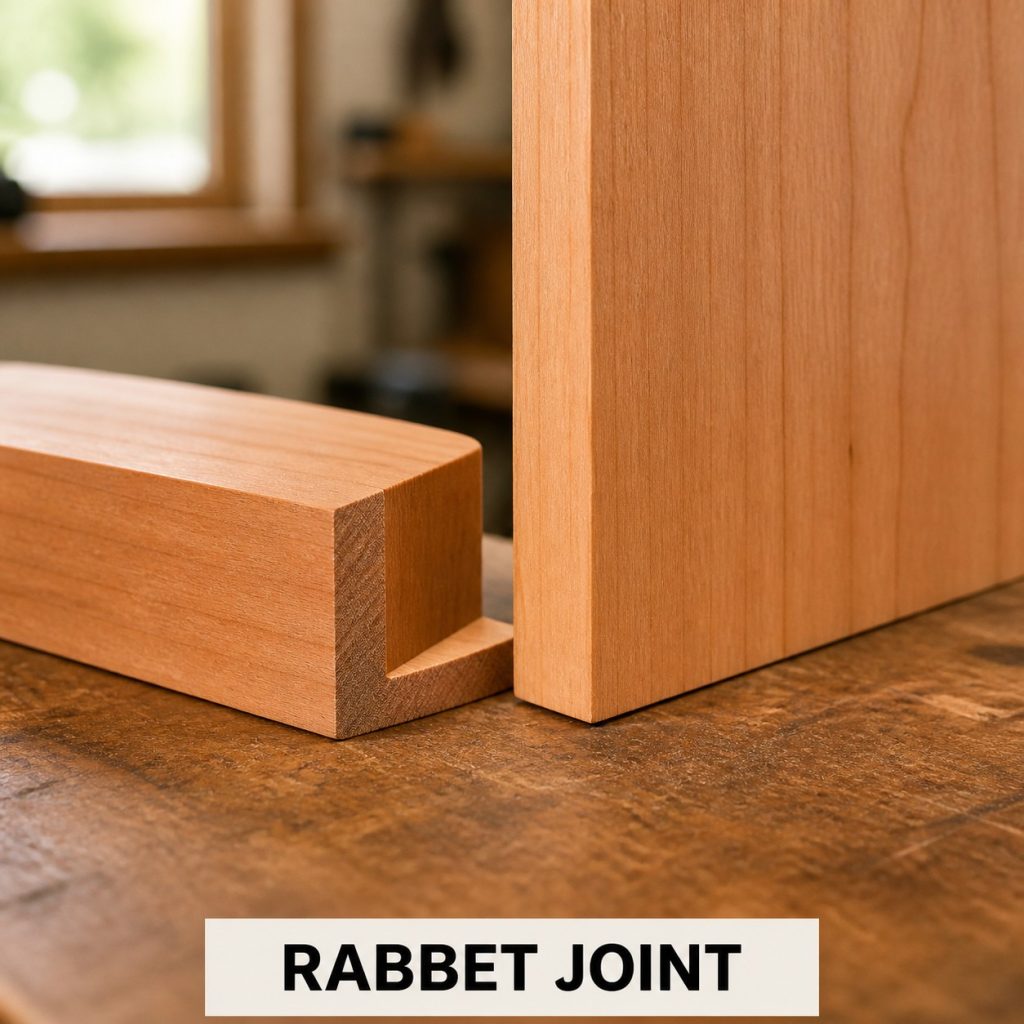
How it fits: A rabbet removes a rectangular step from an edge or end, leaving one ledge and one shoulder. The mating board sits on that ledge against the shoulder.
Typical uses: Rabbets locate cabinet backs, drawer bottoms, box corners, glass panels, and case components.
Workshop check: Cut from a consistent reference face and size the ledge to the actual mating stock rather than its nominal thickness.
4. Dado Joint
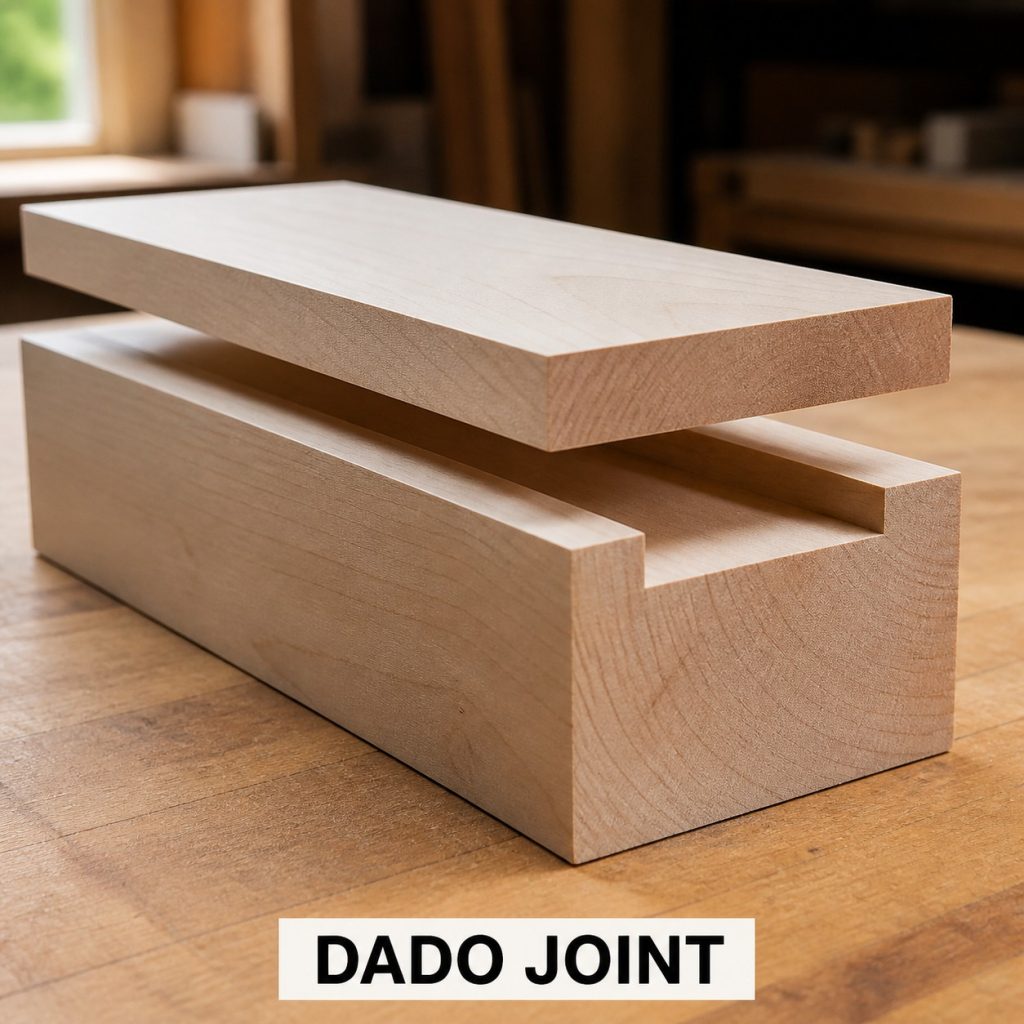
How it fits: A dado is a flat-bottom groove cut across a panel face. The end of a shelf or divider fits between the two shoulders of the groove.
Typical uses: Dados are widely used for bookcase shelves, cabinet dividers, partitions, and drawer construction.
Workshop check: Measure the real shelf thickness and make the groove in stages. A dado that is too tight can bow a panel; one that is too loose loses registration.
5. Half-Lap Joint
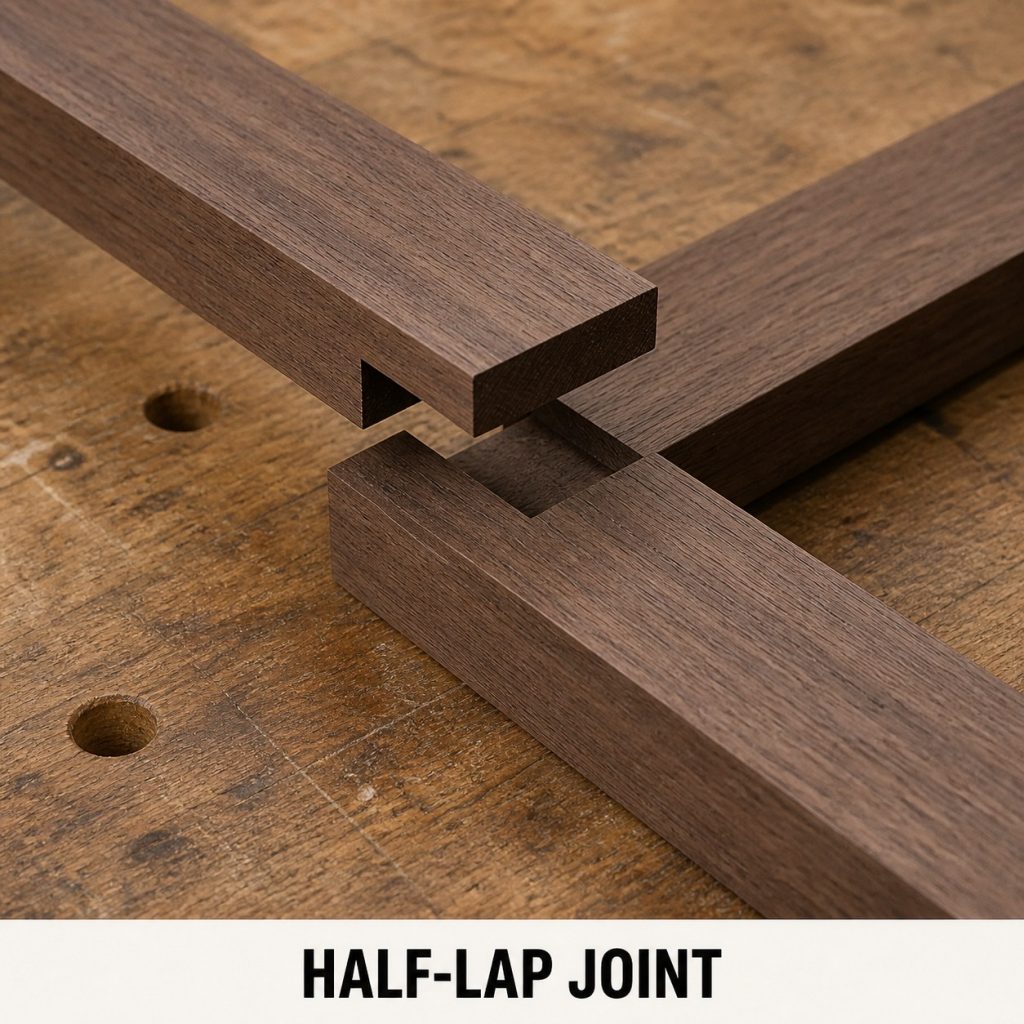
How it fits: Each crossing member loses half its thickness over the overlap. The two recesses nest so the outer faces finish approximately flush.
Typical uses: Half-laps suit frames, trellises, workbench parts, face frames, and light structural grids.
Workshop check: Set the depth from the actual combined stock thickness and keep both notch floors flat so the pieces do not rock.
6. Tongue-and-Groove Joint
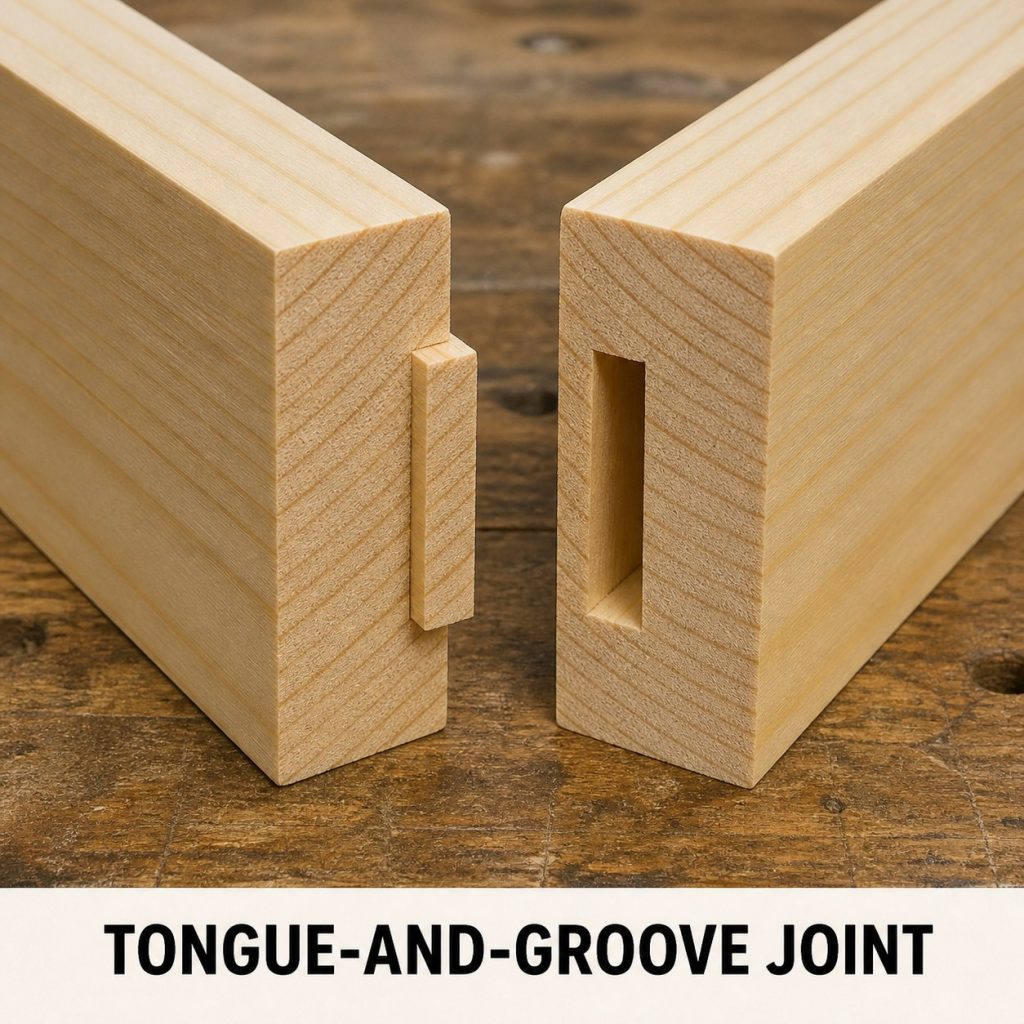
How it fits: A centered tongue along one edge enters a matching groove in the next board. The profiles align the faces while allowing a long edge connection.
Typical uses: Tongue-and-groove profiles appear in flooring, wall paneling, cabinet backs, tabletops, and frame panels.
Workshop check: Keep the tongue slightly shorter than the groove depth so the visible shoulders close before the tongue bottoms out.
7. Biscuit Joint
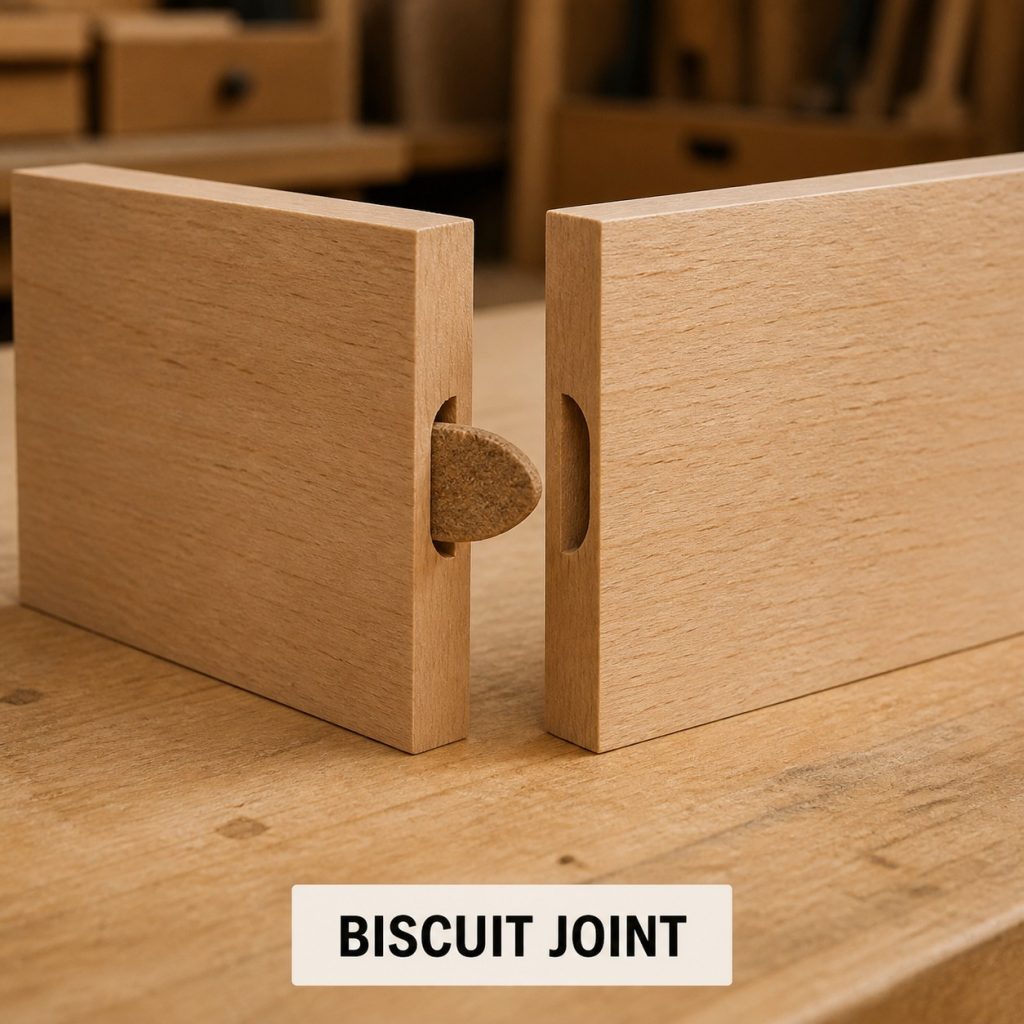
How it fits: Matching crescent-shaped slots receive a compressed oval beech biscuit. Glue causes the biscuit to swell while the slots help register the surfaces.
Typical uses: Biscuit joints are useful for panel alignment, face frames, miters, cabinet cases, and edge-to-edge glue-ups.
Workshop check: Register the joiner from the same face on both boards and keep each slot centered on its layout line.
8. Loose Tenon Joint
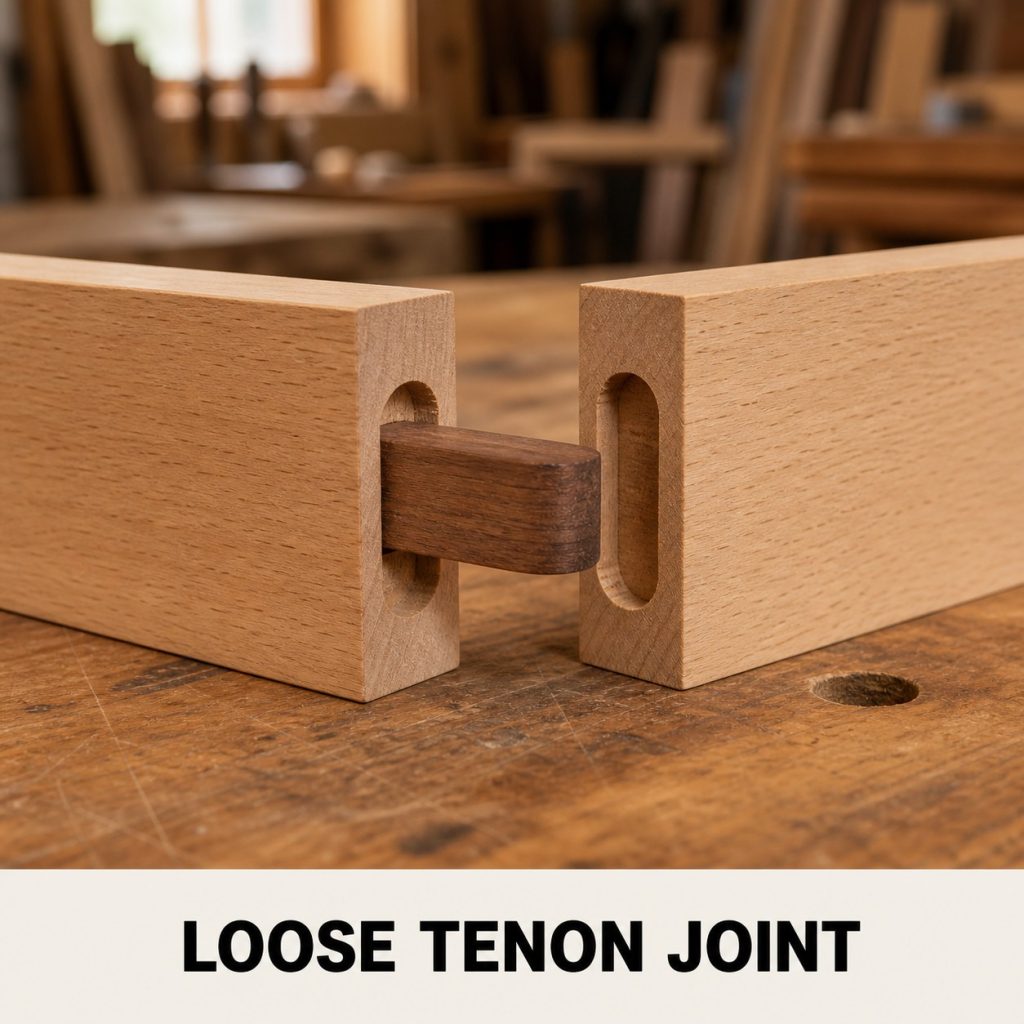
How it fits: Two matching mortises receive a separate floating tenon. The loose tenon bridges the pieces and provides long-grain glue surfaces on both sides.
Typical uses: Loose tenons work in tables, chairs, cabinet doors, frames, rails, and many modern furniture assemblies.
Workshop check: Use reliable reference faces, match mortise depth on both parts, and leave a little room at the ends for excess glue.
9. Bridle Joint
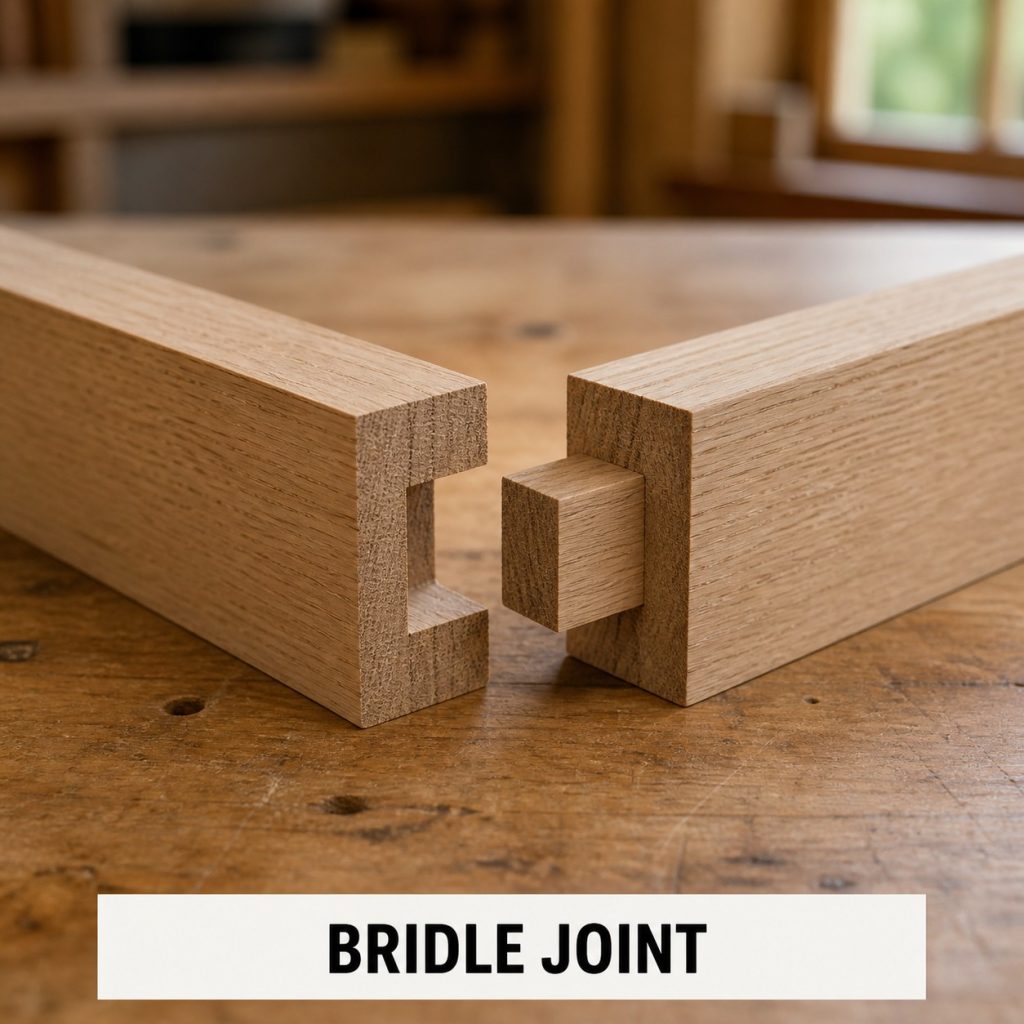
How it fits: One member has an open-ended slot while the mating member carries a full-depth centered tongue. The exposed cheeks make the fit easy to inspect.
Typical uses: Bridle joints are used in frames, trestles, table legs, gates, and rail-to-leg connections.
Workshop check: Keep the cheeks parallel and the tongue centered. Dry-fit gently because thin outer walls can split if the tongue is oversized.
10. Mortise-and-Tenon Joint
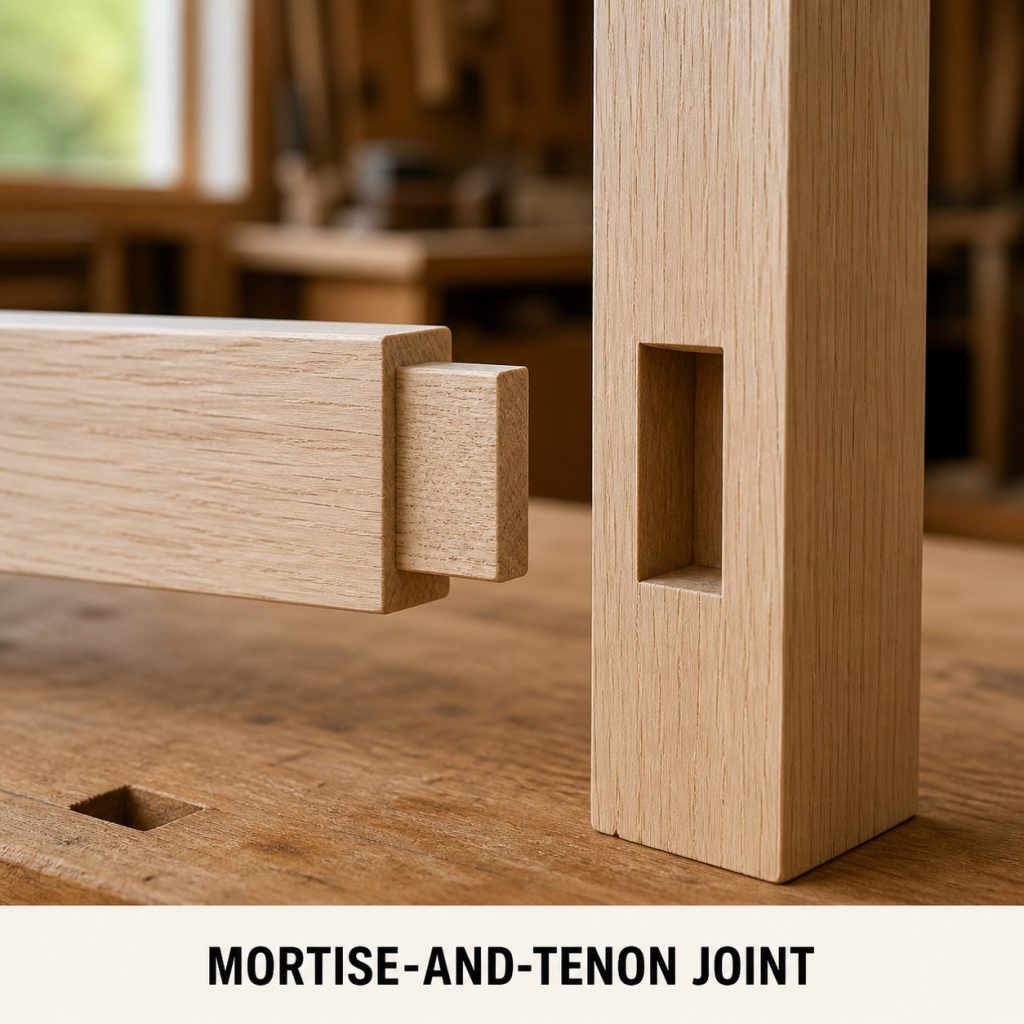
How it fits: A rectangular tenon cut on the rail enters a matching mortise in the post. The tenon carries the connection while the surrounding shoulders close against the post.
Typical uses: Mortise-and-tenon joinery is a foundation of tables, chairs, doors, frames, benches, and timber work.
Workshop check: Fit the tenon to the mortise, not the reverse. Keep the shoulders square and confirm that the mortise is slightly deeper than the tenon length.
How to study a wood joint before cutting
- Identify the reference face and reference edge on every piece.
- Mark the mating parts directly from each other whenever practical.
- Make a full-size sample from scrap of the same thickness.
- Dry-fit before glue and check that shoulders close without forcing the joint.
- Confirm grain direction and leave enough material around notches, holes, and mortises.
- Use guards, hold-downs, eye protection, dust control, and the tool manufacturer’s instructions.
Frequently asked questions
Which wood joint should a beginner practice first?
A half-lap, rabbet, dado, dowel, or loose-tenon sample makes a useful starting point because the reference surfaces and fit are easy to inspect.
Should a joint be forced together?
No. A dry joint should assemble with controlled hand pressure or light tapping appropriate to the design. Excessive force can split thin cheeks, tails, or shoulders.
Are the dimensions shown in these photographs?
No. The images identify geometry and orientation only. Use measured plans or develop dimensions from the real material and required load.
Why make a test joint?
A scrap test reveals cutter width, machine setup, grain behavior, and fit before an error reaches a finished component.
Continue learning about wood joints
Read 10 Advanced Wood Joinery Techniques Explained for ten more labeled joinery examples.