Project planning guide
Before you build
Use the reference image and planning notes as a starting point. Confirm dimensions, loads, materials, local codes, and site conditions before purchasing or cutting.
- Home Improvement
- 1 reference image
- Print-friendly guide
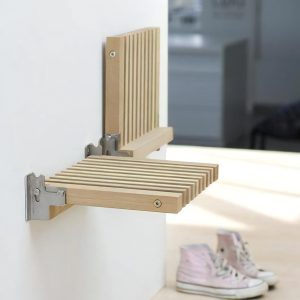
Vertical shoe storage works well where floor depth is scarce. Multiple shallow racks can organize footwear without creating a bulky cabinet near the door.
Plan the project
Measure shoe depth and the available door swing. Place everyday pairs at easy reach and lighter seasonal footwear higher. Maintain a clear walking path and access to switches or vents.
Build for strength and serviceability
Mount rails into studs or use anchors rated for the wall and expected load. Tilt shelves only enough to retain shoes and add a front stop where necessary. Modular units simplify future changes.
Finish and use it well
Choose an easy-clean surface and leave airflow around damp footwear. A washable mat below catches grit. Keep heavy boots low to reduce wall loads and the risk of falling objects.
Adapt dimensions, fasteners, and structural details to your materials, site, and local requirements. Use appropriate personal protective equipment and consult a qualified professional where structural, electrical, or code questions apply.
Measure real footwear
Record the longest, widest, and tallest shoes that must fit, including boots. Measure the wall around switches, trim, vents, and door swings. Place a temporary outline at full size and confirm loaded shoes will not project into the walking path. Reserve the lowest positions for wet or heavy footwear.
Choose the holding method
Rails, tilted shelves, heel supports, and individual pockets suit different footwear. Test the proposed angle with several shoe styles; a solution that holds sneakers may deform soft leather or release a smooth sole. Make components removable or adjustable where the household’s needs are likely to change.
Wall attachment and cleaning
The rack and all shoes create a significant cantilevered load. Fasten primary rails to studs or engineered backing, using appropriate fasteners and spacing. Protect the wall from scuffs and moisture, and make drip trays or lower components easy to remove for cleaning.
Final checks
- Shake each holder with an unbreakable test load.
- Eliminate sharp corners near ankles and hands.
- Keep children from using the rack as a climbing aid.
- Provide airflow around damp shoes.
Build the layout from the hardest shoes to store
Measure deep sneakers, narrow heels, children’s shoes, and tall boots, then test the proposed retaining angle with real pairs. A system that works only for one sole thickness will frustrate users and leave footwear on the floor. Mark the full wall elevation with tape, including door swing, switches, trim, and the space needed to lift each shoe free. Put children’s everyday shoes within safe reach and reserve high positions for light, occasional items.
- Add a washable drip area below wet footwear.
- Keep projecting hardware away from shoulder and head height.
- Use wall anchors selected for the verified substrate and loaded weight.
- Allow airflow so damp shoes are not pressed tightly against the wall.
Plan for cleaning and changing households
Entry storage collects grit, salt, and water. Components should be removable or accessible enough to wipe without disassembling the whole wall. Modular rails can adapt when shoe sizes or household members change, but every movable holder still needs positive retention. Recheck fasteners after the first month and whenever the arrangement is heavily reconfigured.