Project planning guide
Before you build
Use the reference image and planning notes as a starting point. Confirm dimensions, loads, materials, local codes, and site conditions before purchasing or cutting.
- Garage Projects
- 1 reference image
- Print-friendly guide
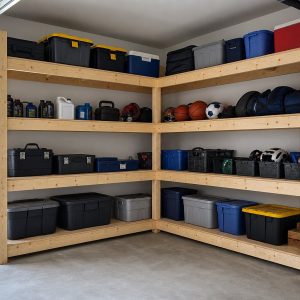
Quick answer: A practical DIY garage shelf for common storage totes is about 8 feet long, 24 inches deep, and 7 feet tall, with four plywood decks supported by 2×4 frames. Treat those dimensions as a starting point: measure your bins, wall studs, door tracks, outlets, and base before cutting.
Choose dimensions around what you store
Start with the containers, not the lumber. Place the largest tote on the floor and add 2 to 3 inches of clearance above it. Repeat for each shelf opening. A 24-inch depth works for many large totes while keeping their handles reachable. If the garage is narrow, an 18-inch shelf can preserve a safer walking aisle.
| Decision | Useful starting point |
|---|---|
| Overall size | 96 in. W × 24 in. D × 84 in. H |
| Shelf decks | 3/4-in. plywood or rated OSB |
| Frame | 2×4 lumber with intermediate supports |
| Bottom clearance | 3 to 4 in. above the slab |
Build four rigid shelf frames
Make each tier as a rectangular 2×4 frame with a front rail, back rail, end pieces, and intermediate crossmembers. Keep the crowns facing the same direction and assemble on the flattest floor available. Check both diagonals before fastening; equal diagonals indicate a square frame. Attach the plywood deck after the frame is square so it acts as a diaphragm rather than locking in a twist.
Stand and connect the tiers
- Mark every shelf elevation on all four legs at once.
- Clamp the lowest frame between the front and rear legs, level it, and fasten it.
- Add the top frame next to stabilize the structure.
- Install the middle tiers and confirm the openings fit your actual totes.
- Shim for an uneven slab rather than forcing the unit out of square.
Anchor before loading
A tall shelving unit can rack or tip even when it feels heavy. Locate wall framing and anchor the back rail with fasteners suitable for the wall construction. Keep dense items such as automotive fluids and hardware on the lowest tier. Reserve the top for light seasonal bins, and never publish or rely on a load rating that has not been engineered or tested.
Make the storage system easier to use
Leave one bay flexible instead of sizing every opening identically. Label totes on both the front and the end. A shallow tray on a middle shelf prevents small bottles from disappearing behind larger bins. For unused corners, compare this straight run with our L-shaped garage corner shelf guide. For a complete shop plan, see the small garage workshop layout.
Create a written loading plan
Assign each shelf a type of storage before loading it. Dense hardware, liquids, and power tools belong low; light seasonal containers can go higher. Mark an intentionally conservative load limit on each level based on the complete design, not only the plywood rating. The weakest connection, unsupported span, uneven floor, or wall restraint can govern performance.
- Keep chemicals in their original containers and follow storage instructions.
- Leave electrical panels, outlets, valves, and equipment service areas accessible.
- Use bins that fit without projecting into the parking or walking aisle.
- Inspect sagging, moisture damage, loose anchors, and split lumber twice a year.
If the garage floor slopes, level the structure with durable shims or adjustable feet rather than twisting the frame to meet the slab. Never climb the shelves; provide a stable, suitable access method for upper bins.
Common questions
Is plywood or OSB better for garage shelves?
Plywood usually has cleaner edges and better screw holding; rated OSB is often economical. Keep either material off damp concrete and support it at intervals appropriate to the span and expected load.
Should garage shelves be attached to studs?
Yes, tall freestanding shelves should normally be restrained to sound wall framing. Verify what is behind the wall and select compatible structural fasteners.